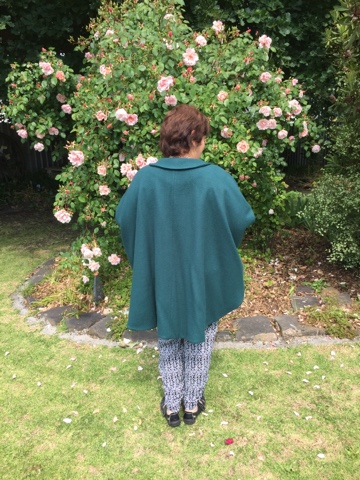
So a few months ago - I nabbed myself some dreamy navy cashmere blend wool coating, and a very fun white and fuschia spot crepe for a lining. I had envisigned a Milano Cape by papercut patterns, I needed it! I wanted to be a superhero dammit!! When I told my lovely mother of these plans, she pondered it for about three seconds, looked at the pattern and then demanded one too. What can I say... we all wanted to be a superhero...
I haven't sewn mine up as yet, but thought I better get a wriggle on with sewing up mum's, mainly due to mum finishing my beautiful crochet quilt (it's only taken 3 years, thanks mum), and I thought I better have a little something to contribute to the gift exchange..
Also - I am well aware that tomorrow marks the first day of Australian SUMMER and I am blogging a winter cape.. It was finished a little while ago, but nabbing photo's was tricky! So thanks mum for donning your winter cape on a 30 degree day!
Also - I am well aware that tomorrow marks the first day of Australian SUMMER and I am blogging a winter cape.. It was finished a little while ago, but nabbing photo's was tricky! So thanks mum for donning your winter cape on a 30 degree day!
The pattern in the Milano Cape from papercut patterns. I have no complaints about the construction of the cape, it was well laid out and quite simple! I did however, not fancy a winter cape without a lining fabric.. And a lining the pattern does not have! I googled. And then googled some more.. and couldn't find a tutorial on drafting a lining for the cape - So I used the principals from Lladybirds little spiel on drafting a lining for her Rigel Bomber (also by papercut).. and just kind of.. fudged it.
I used a super lovely floral silk to line mum's cape in, which contrasts really nicely with the bottle green cashmere wool blend outer. I found all the essentials at my old haunt - Eliza's in Sunshine. She seriously has some lovely little bits. Or nothing. Some days there is literally crap in there - like nanna floral chiffon and dance fabrics... other days, she delivers these! In winter the coating supplies are pretty excellent!
Now, back to my lining drafting experience. This was my first time, and I basically used a little bit of maths, a little bit of tracing, and then prayed and cut... I had a similar experience to Amanda over at Bimble and Pimble and had some excess fabric in places (maths fail), however, I was able to pleat this in which is now definitely a design feature! And the lining fabric is VERY BUSY, so the teeny tiny pleats are well hidden, I had to point them out to mum, she wasn't too concerned. I used a litle V pleat at the neckline, mainly because all my RTW coats have this little vent feature, and it looks kind of neat, even if it isn't neccesarily a funcitonal feature for the coat.
The other win was my first attempt at welt pockets. And this SHIT IT THE BEST. Such a professional looking finish.. I did have a bit of trouble with them, and one may be in upside down... I ummed, and ahhh'd about what to do about it (it also took me a ridiculously long time to realise one was upside down) and after trying to fix it for a while, I just left it as is.. not my proudest moment, but it's happened now.. Ooops.
Overall, I am very happy with the cape. Very happy with the lining. So is mum! So that's always a win. It took longer to prep all the pieces, fusing etc, and to draft the lining than to sew up the cape! I would guess that there is about 10 hours of prep + sewing time. Plus another 1-2 hours on the button holes, the fabric was a little thick for my machine to handle, so took a few attempts (and some swearing and wine)
The little bits:
Fabric: Wool/Cashmere blend coating, floral silk for the lining ($35, $25)
Notions: six buttons, thread ($7-)
Pattern: Papercut patterns: Milano Coat.
Size: M
Total Cost: $67 (excluding pattern at $22-).
Thanks Heli for being a gem and posing for some shots. Stay tuned for my version next winter!
..xx..


No comments:
Post a Comment
lovely thoughts...