Oh Stitch, Please!

Oh Stitch, Please!
Showing posts with label Selfless Sewing. Show all posts

Monday, 30 November 2015

Milano for the Mama!

So a few months ago - I nabbed myself some dreamy navy cashmere blend wool coating, and a very fun white and fuschia spot crepe for a lining. I had envisigned a Milano Cape by papercut patterns, I needed it! I wanted to be a superhero dammit!! When I told my lovely mother of these plans, she pondered it for about three seconds, looked at the pattern and then demanded one too. What can I say... we all wanted to be a superhero...


I haven't sewn mine up as yet, but thought I better get a wriggle on with sewing up mum's, mainly due to mum finishing my beautiful crochet quilt (it's only taken 3 years, thanks mum), and I thought I better have a little something to contribute to the gift exchange..

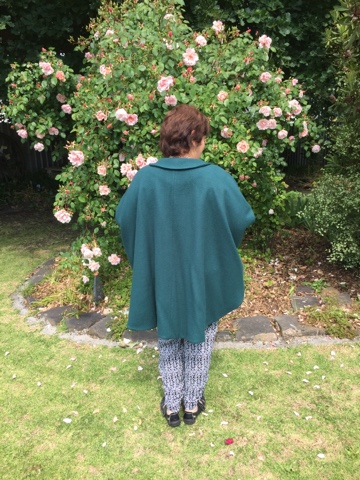
Also - I am well aware that tomorrow marks the first day of Australian SUMMER and I am blogging a winter cape.. It was finished a little while ago, but nabbing photo's was tricky! So thanks mum for donning your winter cape on a 30 degree day!

My lovely crochet blanket!


The pattern in the Milano Cape from papercut patterns. I have no complaints about the construction of the cape, it was well laid out and quite simple! I did however, not fancy a winter cape without a lining fabric.. And a lining the pattern does not have! I googled. And then googled some more.. and couldn't find a tutorial on drafting a lining for the cape - So I used the principals from Lladybirds little spiel on drafting a lining for her Rigel Bomber (also by papercut).. and just kind of.. fudged it. 


I used a super lovely floral silk to line mum's cape in, which contrasts really nicely with the bottle green cashmere wool blend outer. I found all the essentials at my old haunt - Eliza's in Sunshine. She seriously has some lovely little bits. Or nothing. Some days there is literally crap in there - like nanna floral chiffon and dance fabrics... other days, she delivers these! In winter the coating supplies are pretty excellent!


Now, back to my lining drafting experience. This was my first time, and I basically used a little bit of maths, a little bit of tracing, and then prayed and cut... I had a similar experience to Amanda over at Bimble and Pimble and had some excess fabric in places (maths fail), however, I was able to pleat this in which is now definitely a design feature! And the lining fabric is VERY BUSY, so the teeny tiny pleats are well hidden, I had to point them out to mum, she wasn't too concerned. I used a litle V pleat at the neckline, mainly because all my RTW coats have this little vent feature, and it looks kind of neat, even if it isn't neccesarily a funcitonal feature for the coat.


The other win was my first attempt at welt pockets. And this SHIT IT THE BEST. Such a professional looking finish.. I did have a bit of trouble with them, and one may be in upside down... I ummed, and ahhh'd about what to do about it (it also took me a ridiculously long time to realise one was upside down) and after trying to fix it for a while, I just left it as is.. not my proudest moment, but it's happened now.. Ooops.


Overall, I am very happy with the cape. Very happy with the lining. So is mum! So that's always a win. It took longer to prep all the pieces, fusing etc, and to draft the lining than to sew up the cape! I would guess that there is about 10 hours of prep + sewing time. Plus another 1-2 hours on the button holes, the fabric was a little thick for my machine to handle, so took a few attempts (and some swearing and wine)


The little bits:
Fabric: Wool/Cashmere blend coating, floral silk for the lining ($35, $25)
Notions: six buttons, thread ($7-)
Pattern: Papercut patterns: Milano Coat.
Size: M
Total Cost: $67 (excluding pattern at $22-).

See also: Amanda, oneslook

Thanks Heli for being a gem and posing for some shots. Stay tuned for my version next winter!

..xx..

Thursday, 22 October 2015

Minty Elephants - The story of a Nursery set..

During winter, my sister and I decided we would make up a baby gift for our cousin who is expecting her first baby any day now! (Come on baby - we are very excited to meet you!). Earlier on in her pregnancy she was looking for inspiration and stumbled across this little set, and decided they would be her nursery colours - seeing as the sex will be a surprise, it was a gorgeous neutral palate and looks perfect in her nursery space!

  
After seeing her inspiration pieces, we decided it would be fairly easy to replicate something similar, with her colour scheme. So - a few shopping trips later we were ready to get stuck in. And then a few more shopping trips by my sister (as she didn't approve of some of my fabric choices). Megs is the quilter, not me.. she did all the heavy lifting for the quilt, I just provided the machine & man power and did what I was told, and obviously attended with my charming personality. We decided on the quilt and a pillow, and I decided on the bunting. Megs did not want TACKY bunting, but I knew better and made it anyway - and look how sweet it looks tied up in the nursery! If you know Megs, you know it is risky business to deviate from her original plan, but it was a risk I took it, and I am glad I did.. 


We measured a cot sized quilt and then just did some rough calculations for how big each square should be and worked from there - it turned out to be 100cm x 130cm which is a standard cot size blanket.


The fabrics are from Spotlight, Joys Fabric Warehouse in Geelong, and the Millrose quilting shop in Ballan. The felt elephants were particularly fun to make - we used a silohette and traced the elephants out onto the felt, then quilted them down onto the quilt and pillow. If we had enough time I would have liked to put some on the bunting as well! For the bunting I cut out the pieces from the left over fabrics using a simple self drafted triangle shape. I then zipped up the two outside edges with right sides together on the machine and then turned it in, giving it a quick press. I used Bias tape for the connecting cord which also hid all my raw edges. Simple!


There are loads of posts about on making your own baby quilts so I won't go into it too much, mainly because I was a simply a slave to Megs and her quilt making sweat shop... But all in all, it was quicker than anticipated, and a lovely personal gift for a first baby.. Megs quilted the blanket by hand, which was time consuming. She was able to do it on the train on the way to work which made it easier.


Congratulations Mel on the pending arrival of your first addition! I cannot wait to meet baby Irving.


Tuesday, 3 March 2015

3 little flower girl dresses...

After a month of the most precise steaming, cutting, sewing and measuring.. the flowergirl dresses for my best friends wedding were complete!

Also - apologies in advance for the picture heavy post - These girls were just too cute not to include the snaps!

I used the pattern - Vogue V7819.

View A was used.
The dress construction ended up being very simple. Huge rectangle pieces gathered at the waist (I had pre-tacked tulle to these pieces) and then a three piece bodice. No darts, obviously for the little girls, made for easy sewing. Then repeated again for the lining, with a slimmer lining skirt.

The little girls, our dress, and the wedding dress in a row..

The measurements were way off on the pattern envelope, which is not unusual for a big 4 pattern, and I ended up needing to place each of the girls measurements against the flat pattern to pick a size, and then sewed a straight size 2 & 3, with the lengths varying for each of their heights.

Daisy, Tatum and Josie - so sweet.

I added a sash around the waist, to hide the gathered seam-line. Just plain ribbon. The pattern included a sash piece, however, it was quite bulky and didn't look as neat as just the piece of satin ribbon.

The girls showing off their sweet little shoes... sparkly gold.
The dresses took me far longer than they should have, considering they are such a simple sew up! But it is the whole 'selfless sewing' part that means it takes so much longer to finish something... And I was a bit anal in getting construction right...

Megs 'helping'.
But I did have some help from Megs and Heli - my sister and mother. We ended up having a constuction line going with Megs pining, me sewing and Heli pressing - very efficient!

Hugs for the new BFF's...

Group hugs.. X

Happy little ladies - enjoying their day!


They loved wearing white with the Bride!


Ouch! Blisters...


Daisy lost her Sash before the walk down the aisle commenced!
Another wonderful wedding - and I am so happy to have been able to contribute! The little girls loved their dresses!

Specs:

Pattern: Vogue V8719

Size: 1 x size 2 & length 3, 1 x size 2 & length 2 and 1 x size 3 & length 4.

Fabric: Silk Taffeta, bridal tulle and Bemberg silk lining. Waist sash is satin ribbon.

Cost: For the pattern and fabric, a bargain of $145-. 


And of course - the dashing bride and groom enjoyed their day. Looking beautiful and having an amazing time. Their next chapter will be exciting and after 11 years together, married life will be a breeze!

Congratulations Mr and Mrs Wright!


Tuesday, 13 January 2015

Tessuti Alice Dress :)

And in the spirit of blogging out of order and selfless stitching (*pats self of back*)-

Heli's Christmas present!

The dress is the Alice pattern, drafted by Tessuti. Her Alice Dress is a shiny navy linen which I picked up from my local fabric shop. Eliza's is a little fabric shop which has some absolute gems around the corner from my work... Many a lunch break has been lost in the rabbit den of Eliza's fabric....


Heli was a good sport and posed for me in her new little number... Thanks Mum!

The linen was lovely to sew and has a really nice drape. The instructions were easy to follow, which I find with all Tessuti patterns. The only change I made was to stay-stitch the neckline instead of using the tearaway vilene. This is always featured in Tessuti patterns - and I honestly have no clue what it is, but have always stay stitched with good effect!


There isn't really too much to say about the construction of the Alice - except that she runs large, and it may pay to size down. I made the XL for Mum, knowing that it would run large, but also that she likes her clothes to be blouse-y and not restrictive


And some photo's of the guts....


This dress has been doing the rounds in the blogosphere- and it was Instagram which inspired the impulse pattern purchase... So many delicious versions - not enough time to steal idea's....


Heli loving her pockets...


Now she's getting into it! :)


I really enjoyed sewing this, and Mum popped it on to wear on Christmas day - can always count on your Mum to be your biggest fan!

I have some fabric which I have washed ready to cut out to make a few of these numbers for me.. A lovely voile from spotlight with little birdies on it, and a black swiss dot lawn from rathdowne remnants. I will make myself the top version, as I don't think the dress version would be very flattering on my shape.

Specs:
Pattern: Tessuti Alice Dress/Top

Size: XL

Fabric: Navy Linen with a silver sheen/stripe from Eliza's fabric.

Alterations: Nil.

See also: Rachel, Bubala, Elizabeth & Amanda...