Oh Stitch, Please!

Oh Stitch, Please!

Tuesday 29 December 2015

Hack-tastic Flora - BHL.

So.. I made another BHL flora dress. For another wedding.. Yes, tragic! I have done it before, but I do love this dress!


I made a few alterations this time, which took a bit of mucking about. The first was to lengthen the skirt. The skirt is a fabric eater and huge! It's 150cm wide minimum. The fabric I chose was a faux silk I picked up from spotlight. I saw it and the print seemed very Gorman-esque to me, so purhcase! To lengthen the skirt, I added a side panel when cutting. I used a french seam to widen the fabric. You can tell I have done this on the back skirt panels, but as it is a full swishy skirt, it doesn't show to much unless I am pointing it out to you. As I often do! Does anyone else find the need to point out their sewing flaws before someone else see's them? I constantly find myself doing it. When really I am sure nobody else cares!

 
The second alteration was making it backless. I love the contrast of a high neck with a low back, and when I made my first Flora I found myself dreaming about a backless number. Having no drafting experience, and not being sure how I wanted it to look, I just traced my back bodice piece, hacked away at where I wanted it to sit and then folded out the back dart length. I then made the straps super long (about 35cm) and got a friend to fit them for me (13.5cm from the centre zip on each side to be exact). I made the whole thing up in the fashion fabric first, and then just played around with the fit. It was a bit tricky fitting on the sides (I always have trouble fitting BHL patterns to me here, turns out I don't have enough side boob), let alone without the back pieces to absorb any fit changes... so I kind of just played around with the darts until I was happy with them (it was VERY untechnical, more just sewing and trying on and pining and doing it all again).
 

But I was quite happy with the back of the dress in the end. I probably could have pinched a little more out of the centre front which would have assisted with the lack of side boob issue, and made the whole fitting process a tonne easier.. So next time I will probably try that first!


I then just made a full lining (using bemsilk from spotlight) which matched the purple ferns on my main fabric! I just used a gathered skirt instead of the flora skirt for the lining as the bemsilk wasn't wide enough. The lining was attached by machine and then handstitched down at the waist. Because I was then all enamoured by pretty purple matchy matchy-ness, I used a large purple satin bias tape to finish the circular hem. PRETTY! It made it feel a bit more special, and gave the hem a nice swishy-ness.
 
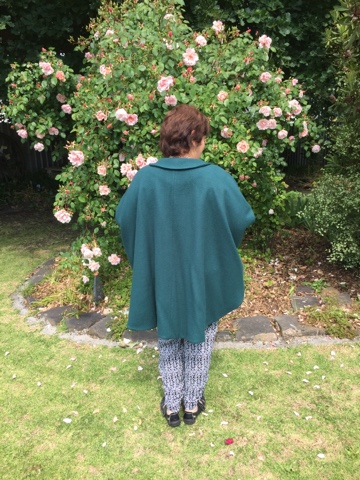
Excuse these wrinkly shots: taken post wedding just for the classic 'guts' shots.


I popped in an invisible zipper and she was done! Pro's are that I am getting more confident with pattern hacking as I go, even if my methods are more cowboy than traditional. Con's are the fabric was a poly (faux silk as per the label - you can't fool me spotlight, I know that means poly!!) and a bit shit to work with, not holding a press, scared I was going to melt it etc. I did melt a test peice when trying to determine how much heat it would handle under the iron, so I was very gentle when pressing it in the end. Things I have learnt: Poly is shit.


Anyway.. THE RUN DOWN:
Pattern: BHL - Flora (backless hack!) - free: used before!
Fabric: 2.5m Faux silk satin (Spotlight), 2m lining (bemsilk). ($50, $14)
Notions: invisible zip, satin bias binding. ($3, $4)
Total Cost: $71-
 
Other bits: Heels - Wittner.


Some less bloggy photo's from the wedding: read 'post several champagne/s'.


  Congratulations to the beautiful Annie & Ciaran! A wonderful evening for a wonderful couple.. Xx

Monday 7 December 2015

#Teambumruffle

Happy summertime fellow Australians! And those in the northern hemisphere - I hope your white Christmas preparations are coming along nicely!


Last week I presented a winter cape, so this week I have done a full 360 and made a summer frock! The Alder by Grainline Studio's to be precise. Another cult pattern release from Jen about 18 months ago. I purchased it at the time of release, but never got a chance to sew it up last summer. I did however, feel it was definitely a summer dress so waited until this summer to sew it up!


This dress has been tried and tested very well over the blogosphere, and for a very good reason! What a brilliant pattern! It came together easily and reasonably quickly for a pattern with so many little details. I began the project using French seams, which would have been fine. However, I chose to make view B. Which includes the glorious aforementioned bum ruffle. Now, this means a right angled seam... which even with the help of Jen's lovely tutorial, I couldn't figure out how to master. I did end up inserting it quite well, with a fairly sharp right angle turn but I just couldn't get that same effect when I was trying to use French seams. So the right angle French seam was abandoned (as was my seam ripper), and I whipped this one seam through the overlocker. It still looks very neatly finished on the inside. And I figured sharp professional outside vs. sharp professional inside should win, when I could only muster one or the other.


The fabric is a lovely cotton, lawn like texture I picked up in Vietnam in May. I found it at the Ben Thanh Market (where I picked up quite a bit of fabric), which came to about $5- per meter. On returning home, I saw it pop up a few other places, and it appears to be a rip off liberty print! Whoops - I'm not sure if this would have impacted my buying, but I still love the print, and it is such a perfect pattern for summery clothes! The quality definitely informs me it is not a real liberty, it had some scratchy pulls when I laid it out to cut, but I was able to cut around those.


It was such a busy print, I didn't attempt to pattern match on the pockets. A feature of the Alder pattern that I love, is all the precision sewing - think top stitching! Very similar to making some menswear. I followed the sew-along directions, including all the extra steps to add a line of top stitching to keep the bum ruffle in place.


I initially added 2 inches to the dress, thinking it would be too short. (I added two inches to my scout tee's as I found them a bit short). However, on hemming, that was lopped off - and the original paper pattern amended to not include this for next time! I also sized out on the bum ruffle, cutting a 14 for the ruffle section. Again, I will probably just cut the straight ten all over, as with the extra fullness in the ruffle it can catch fairly easily in the wind!


I finished my arm holes and hem with bias binding. White for the bottom, which enabled me to keep the lovely curved shape as drafted. I knew I would find it difficult to do a turned hem, so utilised bias tape instead. I had a small amount of my yellow vintage liberty bias binding (scored from etsy several months ago) left which went really nicely with the fabric print, so I decided to use this on the arm holes instead of the bindings drafted my Jen - I figured I had better use some genuine liberty in this make somewhere!


I also used a contrast inner yoke piece, choosing to use chambray instead of self fabric. I love little contrasts like this on my me mades. It took me a little bit of time to work out the button placket and the collar, but I am glad I took the time to do this step properly, as this is what makes the Adler a bit special!


I definitely see more Alders in my future! Woo - team bum ruffle!

The deets:
Fabric: 2m of cotton from Vietnam.
Notions: 9 buttons (10c each from Eliza's), bias tape - vintage liberty and plain white.
Total cost: Pattern (19) + buttons and fabric and notions (25)
= $44-

Other bits: shoes - wittner.

Alder in the wild... amidst my garden..


Monday 30 November 2015

Milano for the Mama!

So a few months ago - I nabbed myself some dreamy navy cashmere blend wool coating, and a very fun white and fuschia spot crepe for a lining. I had envisigned a Milano Cape by papercut patterns, I needed it! I wanted to be a superhero dammit!! When I told my lovely mother of these plans, she pondered it for about three seconds, looked at the pattern and then demanded one too. What can I say... we all wanted to be a superhero...


I haven't sewn mine up as yet, but thought I better get a wriggle on with sewing up mum's, mainly due to mum finishing my beautiful crochet quilt (it's only taken 3 years, thanks mum), and I thought I better have a little something to contribute to the gift exchange..

Also - I am well aware that tomorrow marks the first day of Australian SUMMER and I am blogging a winter cape.. It was finished a little while ago, but nabbing photo's was tricky! So thanks mum for donning your winter cape on a 30 degree day!

My lovely crochet blanket!


The pattern in the Milano Cape from papercut patterns. I have no complaints about the construction of the cape, it was well laid out and quite simple! I did however, not fancy a winter cape without a lining fabric.. And a lining the pattern does not have! I googled. And then googled some more.. and couldn't find a tutorial on drafting a lining for the cape - So I used the principals from Lladybirds little spiel on drafting a lining for her Rigel Bomber (also by papercut).. and just kind of.. fudged it. 


I used a super lovely floral silk to line mum's cape in, which contrasts really nicely with the bottle green cashmere wool blend outer. I found all the essentials at my old haunt - Eliza's in Sunshine. She seriously has some lovely little bits. Or nothing. Some days there is literally crap in there - like nanna floral chiffon and dance fabrics... other days, she delivers these! In winter the coating supplies are pretty excellent!


Now, back to my lining drafting experience. This was my first time, and I basically used a little bit of maths, a little bit of tracing, and then prayed and cut... I had a similar experience to Amanda over at Bimble and Pimble and had some excess fabric in places (maths fail), however, I was able to pleat this in which is now definitely a design feature! And the lining fabric is VERY BUSY, so the teeny tiny pleats are well hidden, I had to point them out to mum, she wasn't too concerned. I used a litle V pleat at the neckline, mainly because all my RTW coats have this little vent feature, and it looks kind of neat, even if it isn't neccesarily a funcitonal feature for the coat.


The other win was my first attempt at welt pockets. And this SHIT IT THE BEST. Such a professional looking finish.. I did have a bit of trouble with them, and one may be in upside down... I ummed, and ahhh'd about what to do about it (it also took me a ridiculously long time to realise one was upside down) and after trying to fix it for a while, I just left it as is.. not my proudest moment, but it's happened now.. Ooops.


Overall, I am very happy with the cape. Very happy with the lining. So is mum! So that's always a win. It took longer to prep all the pieces, fusing etc, and to draft the lining than to sew up the cape! I would guess that there is about 10 hours of prep + sewing time. Plus another 1-2 hours on the button holes, the fabric was a little thick for my machine to handle, so took a few attempts (and some swearing and wine)


The little bits:
Fabric: Wool/Cashmere blend coating, floral silk for the lining ($35, $25)
Notions: six buttons, thread ($7-)
Pattern: Papercut patterns: Milano Coat.
Size: M
Total Cost: $67 (excluding pattern at $22-).

See also: Amanda, oneslook

Thanks Heli for being a gem and posing for some shots. Stay tuned for my version next winter!

..xx..

Monday 9 November 2015

TwoPieceSetacular - Spring Racing Carnival


"(two piece) Setacular, (two piece) Setacular 
No words in the vernacular 
Can't describe this great event 
You'll be dumb with wonderment 
Returns are fixed at ten percent 
You must agree, that's excellent 
And on top of your fee" - Mouline Rouge. 
I feel this song is definitely about Ada Spragg (Sophie) two piece setacular challenge!


Show tunes aside. I am ridiculously happy with this make. Pause for a moment to appreciate that I am over a year late to the party, but to be fair I have been planning this two piece set since March this year. But as I didn't have a real reason to sew it, the pretty fabric just sat there waiting for it's time to shine. Enter Melbourne Spring Racing Carnival 2015. I am not going to touch on the debate here about horse racing. But I definitely understand why it is a big no no for some people. I thoroughly enjoy the fashions, and watching what others are wearing on the day - also a special mention to the cup day fashions on the field winner in her home made dress. Her fabric was a Tessuti purchase!


The set was ridiculously easy to sew, and CHEAP. It was actually one of those sews that turned out EXACTLY AS I PLANNED IN MY HEAD. That shit never happens. I am appreciating the marvel of this sew. I knew I wanted some kind of boxy crop with a more fitted skirt. initially I had been thinking of cropping the scout and having little sleeves, potentially a ruffled hem... but then I remembered the lovely cropped version on Workroom Socials page and knew that was what I wanted. I missed out on nabbing a copy of the Charlotte Skirt before production of BHL paper patterns stopped, luckily she is available in PDF. I wasn't sure if this pattern was going to be one that would work for me, so my lovely friend allowed me to try hers and I traced it quickly a few months back.


The Charlotte skirt is a beautiful pattern, very easy to sew and very easy to fit! It has 8 darts around the top of the skirt to create shaping, and then is pegged in towards the knee's. This pattern is drafted for those ladies like me who are sporting a badoonkadoonk. Yep. Junk in the trunk. Hello hippy heaven! Previously I have avoided pencil skirts like the plague, BHL ladies you have opened up a new world for me. Am planning a leather look version right now!


Back to the set. After completing the darts, I popped in an invisible zipper (with my new invisible zipper foot. LIFE CHANGED). This happened twice. The first time my brain malfunctioned and I put the zipper in at the legs end... this was naturally the most perfectly inserted beautiful invisible zipper of my life. Seam ripper action, swearing, zip inserted into correct end, then it was fitting time. I put the skirt on inside out, and then had some lovely friends to assist me by pinning the excess down the side seams of the skirt, playing with the amount of peg at the knee's until we were all happy with the effect. I roughly transfered these markings to my traced paper pattern, but I feel with a pencil skirt, it will always take some fitting to get the right fit for each type of fabric I use. I made a little kick pleat at the back of the skirt and am cursing myself for not getting a photo of the pretty topstitching I did there. After that it was simply sewing down my new seam line, finishing my seams and popping on the waistband. I hand sewed down the waistband for a clean and professional finish and closed the skirt waist band with a bar closure. I really like the overlapped tab drafted for the charlotte. It meant I didn't have to be as pedantic about fitting the waistband.


The top was a cropped version of the Workroom Social Tate Top. I have made this number before - see. This time I went for the cropped version. I also added a little detail of a back cut out instead of using a zipper. It wasn't a particularly professional process. I decided I wanted a cut out. So I cut one out, and then I used bias tape to close it up. The inside of the top looks very clean as I used the bias tape on the cutout, arm holes, neck line and hemline keeping the insides streamlined and uniform. The bias tape is a vintage liberty bias tape I found on etsy a few months ago. I only have a little left of this navy, but I also have a yellow and white gingham vintage one sitting there I am planning on using on my Adler dress I cut out yesterday.


The fabric is a pretty little find I stumbled across at Eliza's fabric warehouse in Sunshine. This shop was located around the corner from my old work, so half my stash is made up with fabric I have stumbled across in my lunch break. It is a cotton sateen with enough stretch to work with the charlotte pattern. I didn't line the skirt, due to time.


The important bits:
Patterns: BHL Charlotte Skirt, Workroom Social's Tate Top (borrowed and free pattern = $0-)
Fabric: Eliza's Fabric Warehouse - floral cotton sateen $7pm. $14-. (It is ridiculously wide this fabric)
Notions: Zip & Bar closure ($1.50) Also from Eliza's. Thread from stash.
Total Cost: $15.50
Other bits: Shoes - wittner. Fascinator: target. 

And some more candid shots from race day. 

..xx..